Java IO 的设计模式(壹) —— 装饰器模式
在上一篇,我们知道了 Java IO 的基本使用,从本篇开始,我们一起来探究设计模式是如何在 Java IO 中应用的。首先,我们先要学习的是装饰器模式。
我相信,友好的讨论交流会让彼此快速进步!文章难免有疏漏之处,十分欢迎大家在评论区中批评指正。
什么是装饰器模式
装饰器模式通过组合替代继承的方式在不改变原始类的情况下添加增强功能,主要解决继承关系过于复杂的问题(Java IO 就属于这种复杂情况)。
刚上来,我们先知道装饰器是干啥的,解决啥问题就行,具体的是如何做的,我们边分析边说。
Java IO 庞大的类库
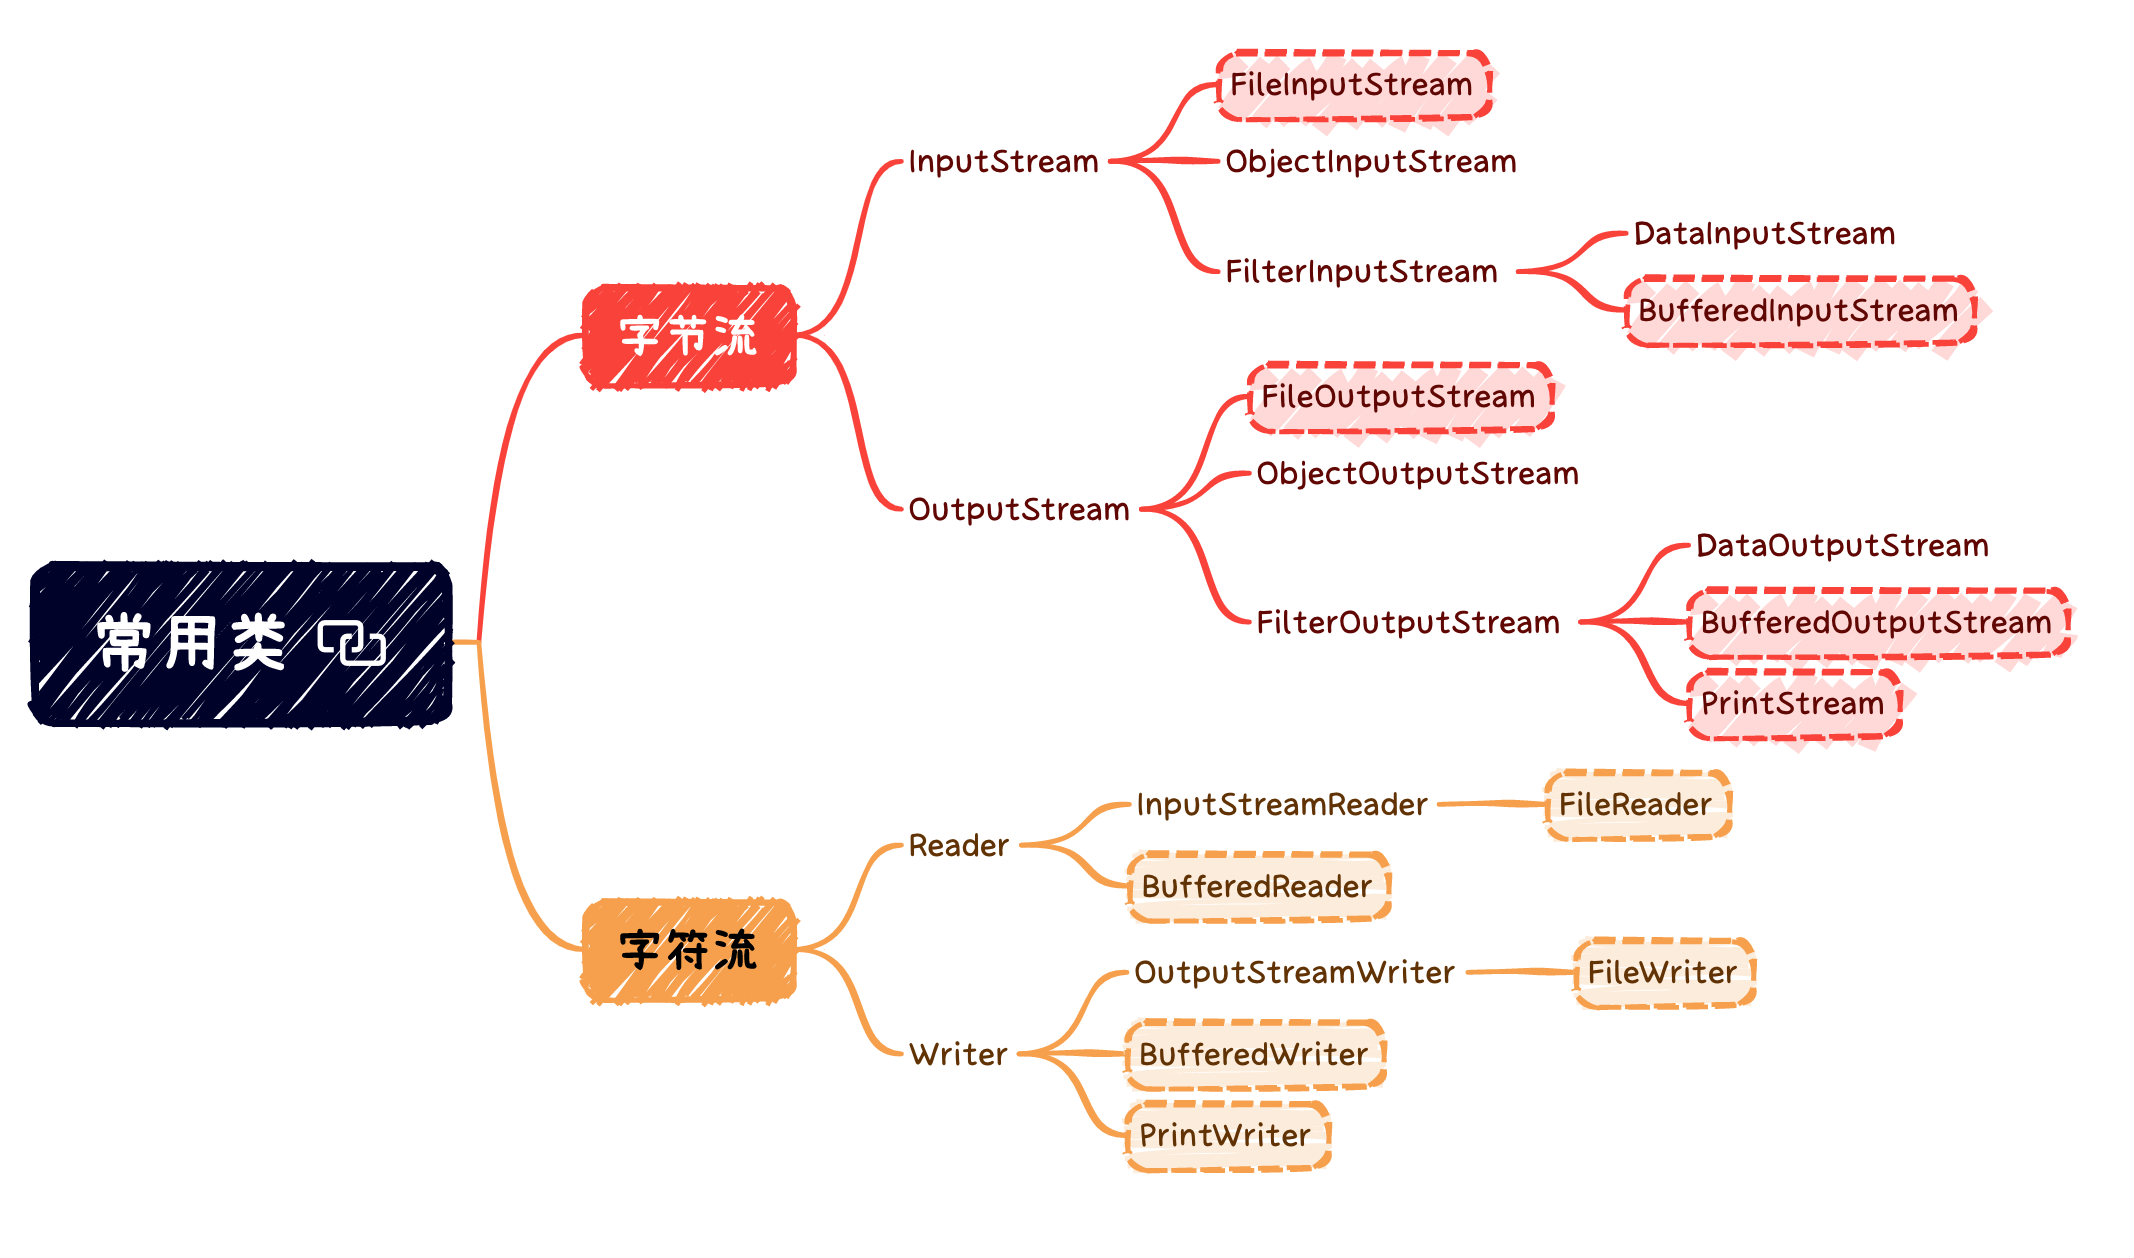
Java IO 的类库十分庞大,有 40 多个类,负责 IO 数据的读取和写入。我们可以从以下角度将其划分为四类,具体如下:
| (抽象基类) | 字节流 | 字符流 |
|---|---|---|
| 输入流 | InputStream | Reader |
| 输出流 | OutputStream | Writer |
针对不同的读取和写入场景,Java IO 又在四个父类基础上,扩展了很多子类。具体如下(只列举了一些常用的类):

Java IO 流的嵌套用法
还记得我们在 Java IO 基础篇中流的使用案例吗?若要使用缓存字节输入流,我们需要在 BufferedInputStream 的构造函数中传递一个 FileInputStream 对象来使用(这就是,使用 BufferedInputStream 增强 FileInputStream 的功能)。具体如下:
1 | try (BufferedInputStream bis = |
或许,你可能想为什么 Java IO 不设计一个继承 FileInputStream 并且支持缓存的 BufferedFileInputStream 类呢?
如果是这样的话,我们岂不是可以直接创建一个 BufferedFileInputStream 类对象,支持缓存并且可以打开文件读取数据,这样多省事简单啊。
1 | try (InputStream in = new BufferedFileInputStream("test.txt")) { |
我们的这种思路就是基于继承的设计方案了。
基于继承的设计方案
如果说 InputStream 只有一个子类
FileInputStream 的话,那么我们在 InputStream
基础上,再设计一个孙子类
BufferedFileInputStream,也算是可以,毕竟继承结构比较简单,能够接受。
然而,事实上,我们在上面的常用类图中也看到了,继承
InputStream 的子类非常多,那么我们就需要给每一个
InputStream
子类都派生一个支持缓存读取的子类,这数量太庞大了!
而且,支持缓存只是拓展功能之一,我们还要对其他功能进行增强,比如
DataInputStream 类,它支持按照所有 Java
基本数据类型来读取数据。
1 | try (DataInputStream dis = new DataInputStream(new FileInputStream("test.txt"))) { |
如果我们继续按照继承的方式来实现的话,那我们就需要派生出
DataFileInputStream、DataPipedInputStream
等类。
如果我们还需要既支持缓存、又支持按照基本数据类型读取的类,那就要再继续派生出
BufferedDataFileInputStream、BufferedDataPipedInputStream
等超多的类。
现在只是附加了两个增强功能,如果要添加更多增强功能,那就会导致类数量爆炸,类的继承结构将变得无比复杂,代码既不好拓展,也不好维护。
那有没有什么办法可以解决这个问题呢?当然有,我们可以使用组合(composition)和委托(delegation)达到继承行为的效果。这种方案符合设计原则:多用组合,少用继承。
基于继承的设计方案,所有的子类都会继承到相同的行为。而使用组合和委托,我们可以动态地组合对象,可以写新的代码添加新的功能,而无需修改现有代码,引进 bug 的机会将大幅减少。这也符合另一个设计原则:开闭原则,类应该对扩展开放,对修改关闭。
基于装饰器模式的设计方案
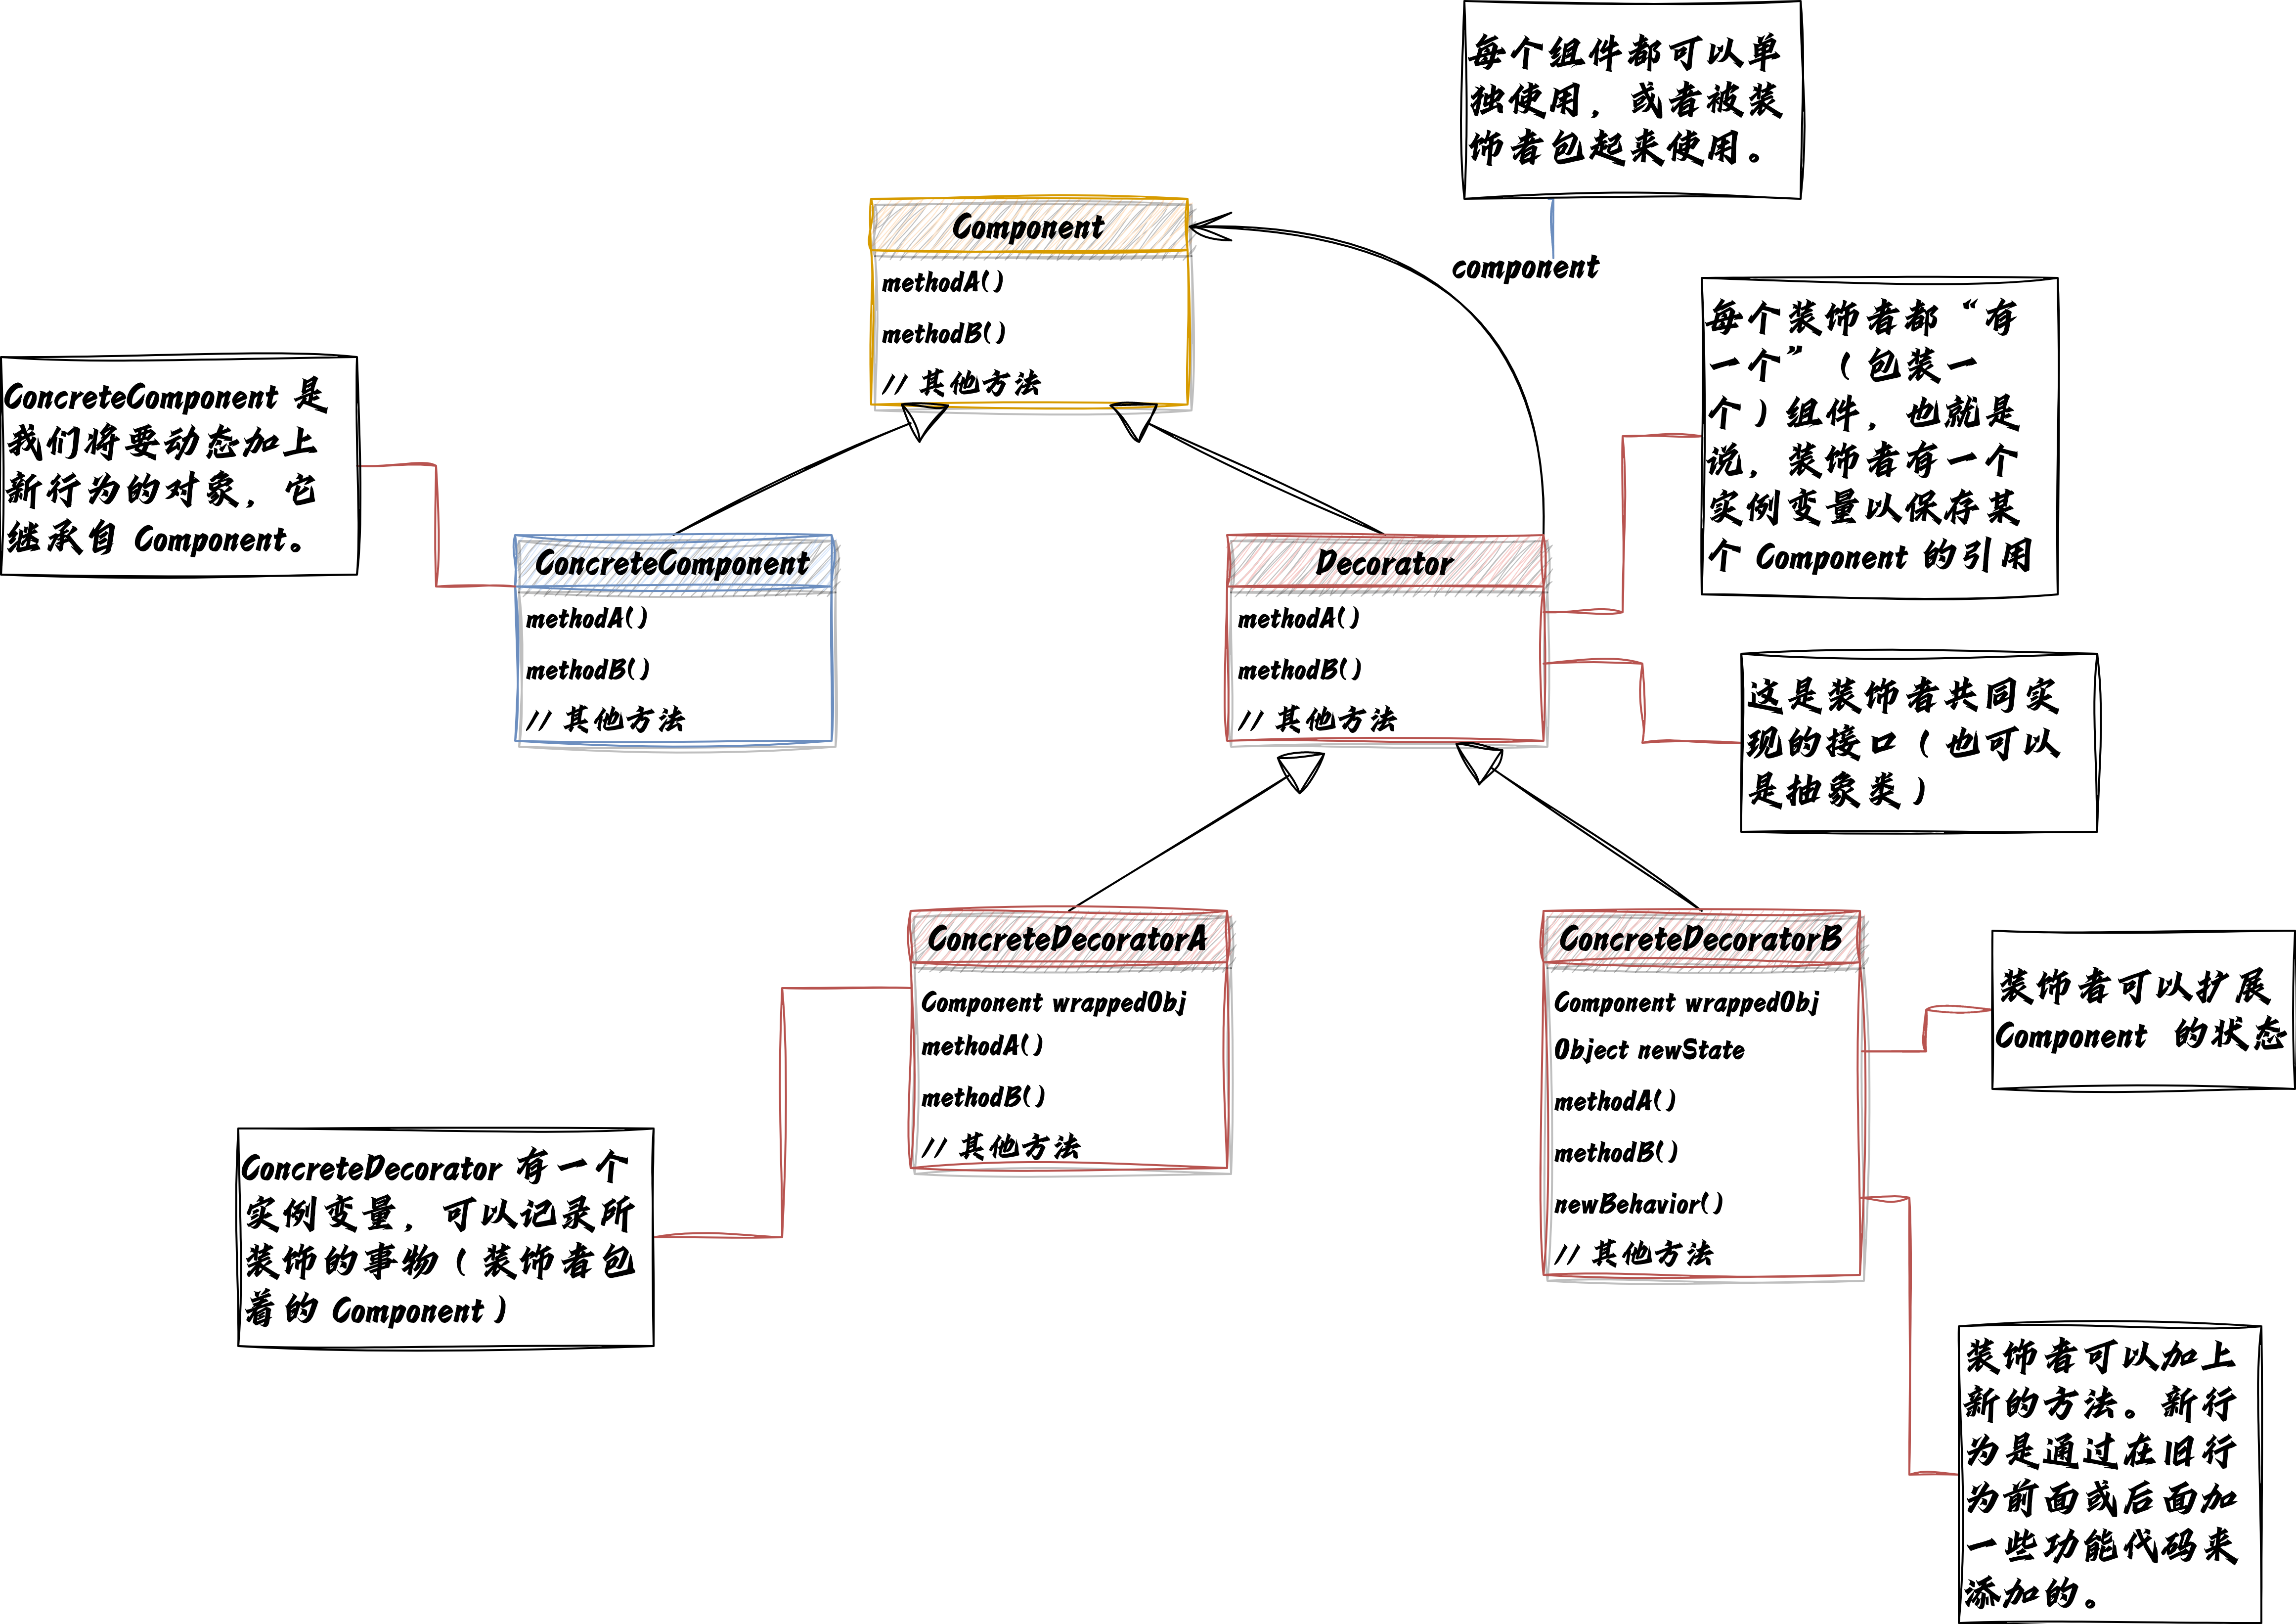
装饰器模式的标准类图
由于使用继承实现的结构过于复杂,Java IO 采用了基于装饰器模式的设计方案。我们先来看看装饰器模式的标准类图是什么样子的。

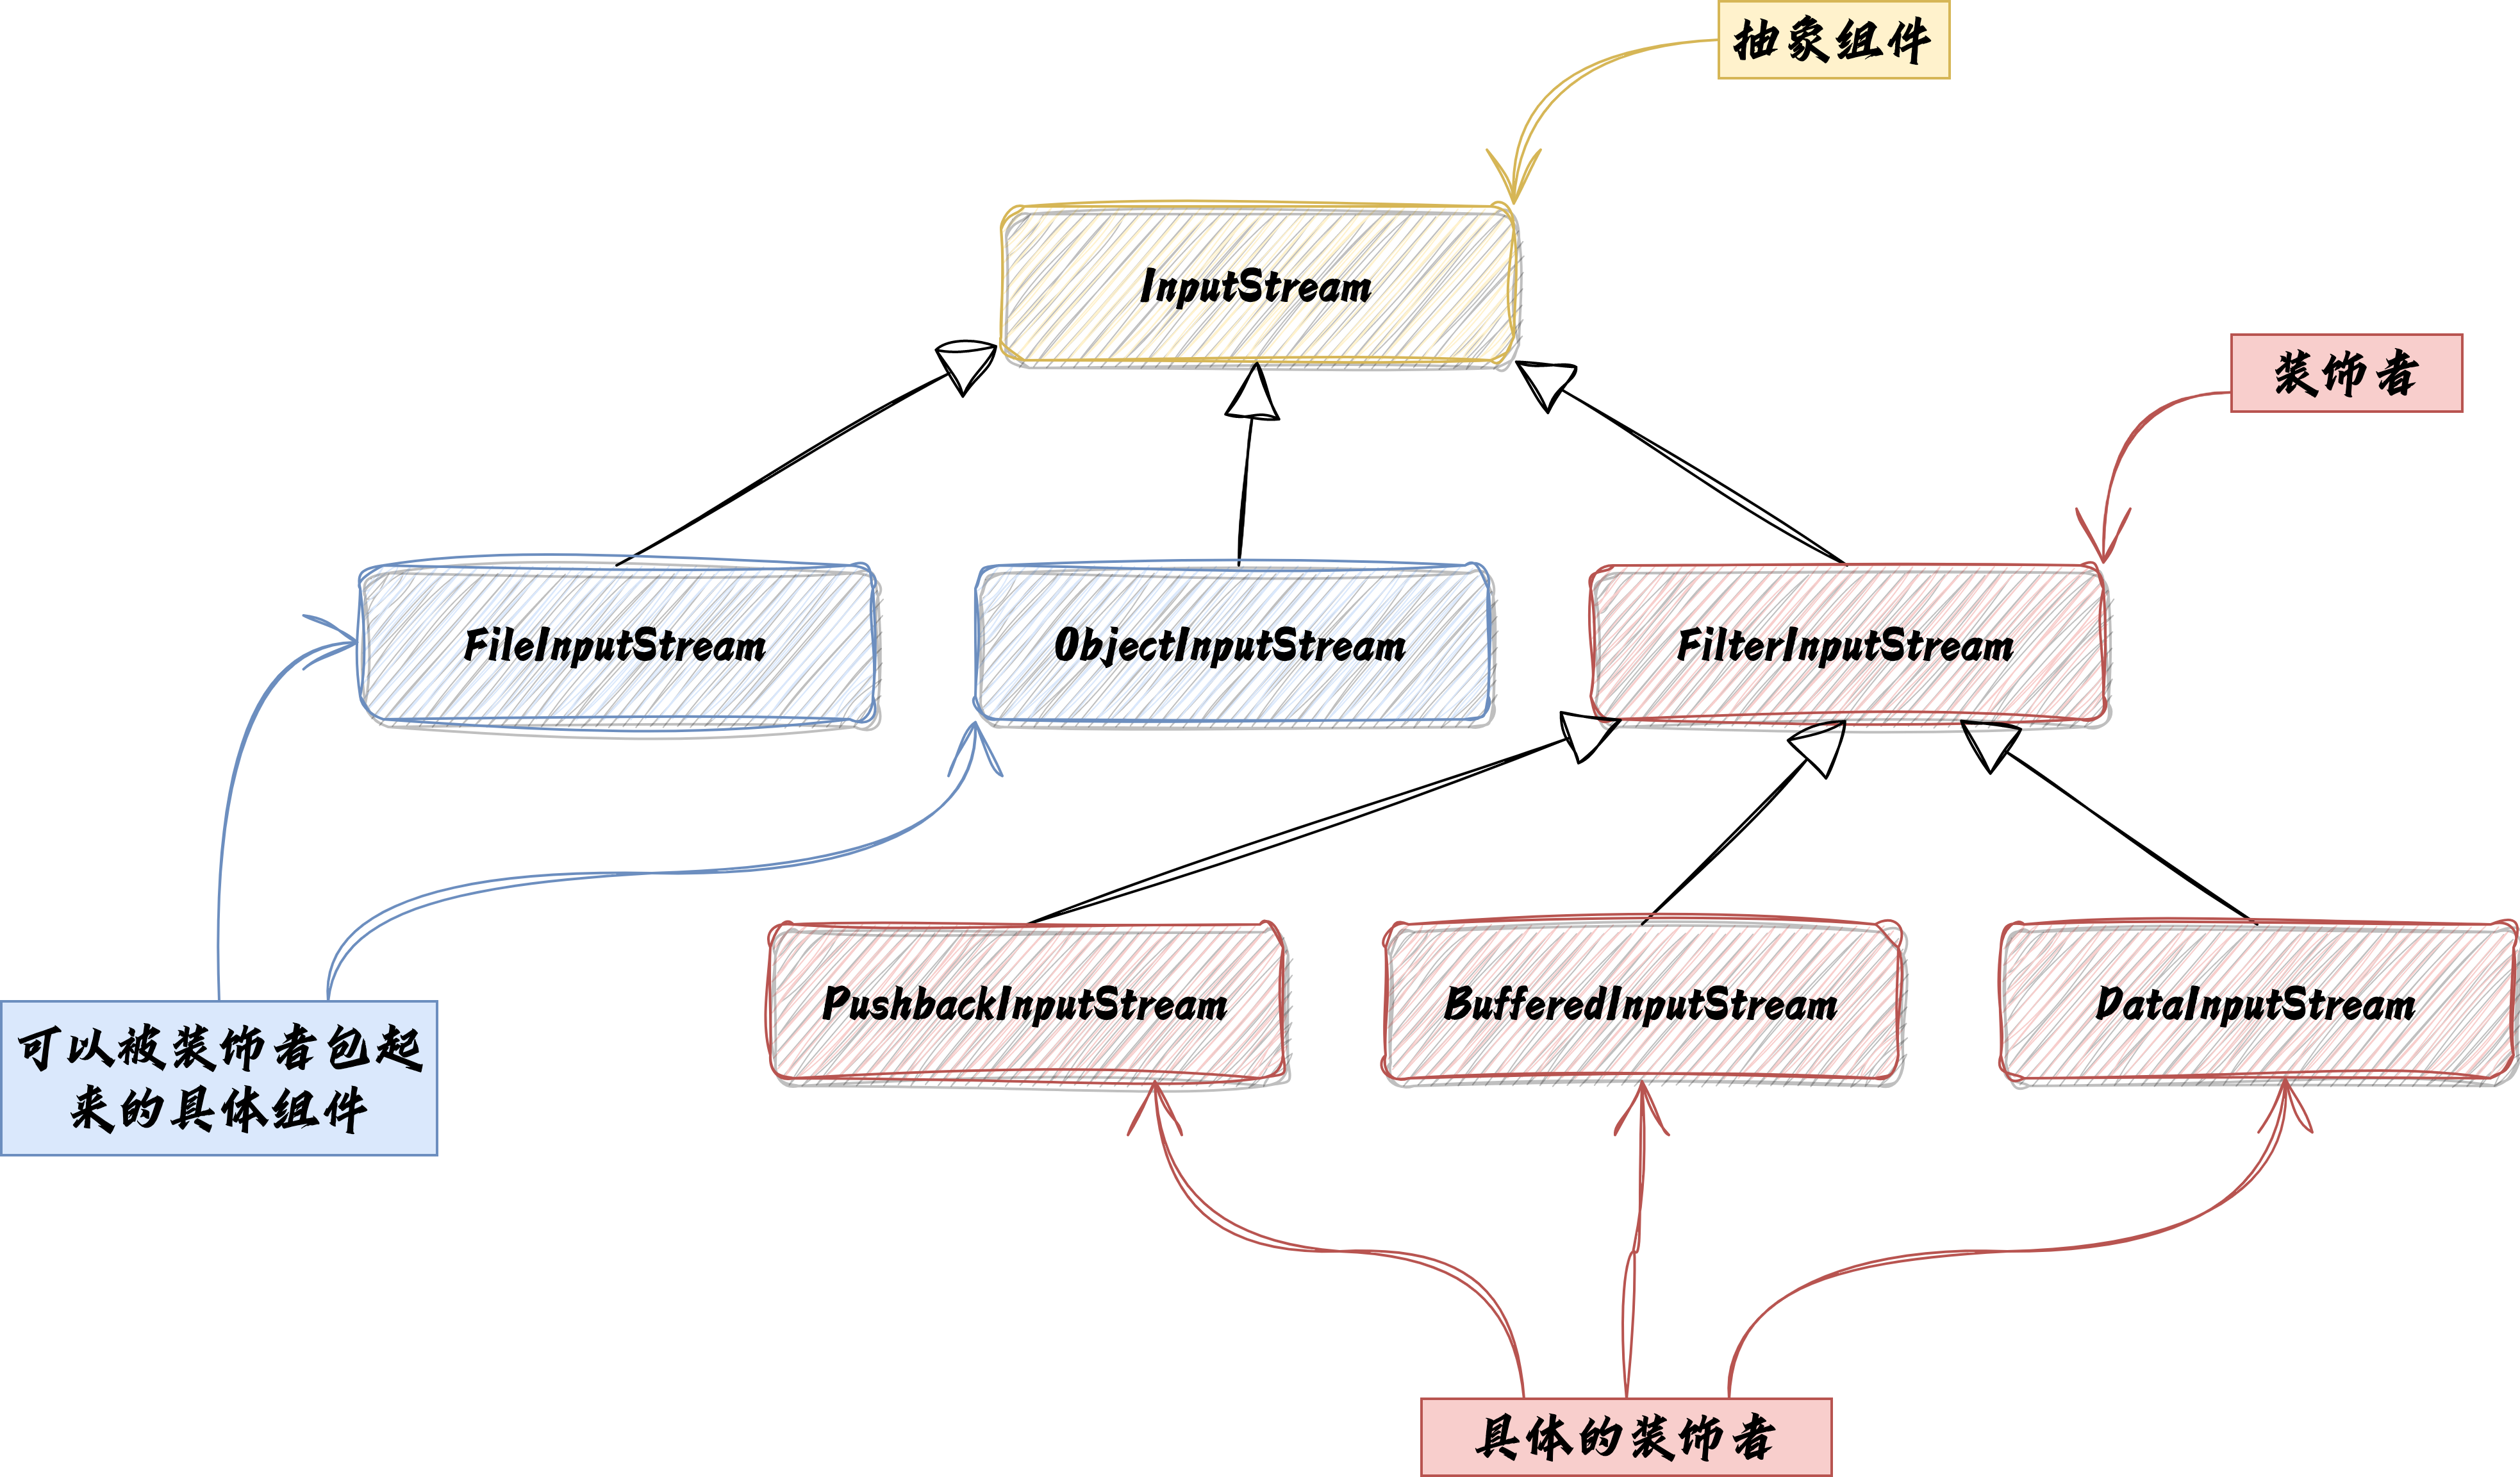
从类图角度分析 Java IO 是如何使用装饰者模式的
首先我们先从类图的角度来看看 Java IO 是如何使用装饰者模式的。

从源码角度分析 Java IO 是如何使用装饰者模式的
我们再从源码的角度去查看 Java IO 是如何使用装饰者模式的。
InputStream(抽象组件)
下面是简化后的 InputStream 源码,它是一个抽象类,作为一个抽象组件。我们具体看 read() 方法。
1 | public abstract class InputStream { |
FileInputStream (具体组件)
FileInputStream 继承自 InputStream,有公有的构造方法可以直接使用,也可以被装饰者包起来使用。功能函数的实现逻辑与 InputStream 的实现逻辑不同,是新的行为。
1 | public class FileInputStream extends InputStream { |
FilterInputStream(抽象的装饰者)
下面是 FilterInputStream 源码,它继承了
InputStream,作为一个装饰者,它保存了抽象组件的引用。构造函数声明为
protected,表明用户不能直接构造该类的对象,只能构造该类的子类对象。
FilterInputStream 没有对 InputStream 的
read() 进行增强,但是还是将其重新实现了一遍,简单地包裹了对
InputStream 对象的函数调用,委托给传递进来的
InputStream 对象来完成。
请务必查看代码中的关键注释!
1 | public class FilterInputStream extends InputStream { |
BufferedInputStream(具体的装饰者)
BufferedInputStream 继承了
FilterInputStream,作为一个具体的装饰者,它增强了
read()
的功能,添加了缓存功能。请务必查看代码中的关键注释!
1 | public class BufferedInputStream extends FilterInputStream { |
PushbackInputStream(具体的装饰者)
和 BufferedInputStream 一样,继承了
FilterInputStream,它添加了一种在读取输入流时将数据“推回”流中的功能,从而可以重新读取该数据。请务必查看代码中的关键注释!
1 | public class PushbackInputStream extends FilterInputStream { |
从上面的代码可以知道,为了避免代码重复,Java IO
抽象出来一个装饰者父类
FilterInputStream,InputStream
的所有具体的装饰器类(BufferedInputStream、DataInputStream、PushbackInputStream)都继承自这个装饰器父类。具体的装饰器类只需要实现它需要增强的方法就可以了,其他方法都继承装饰器父类的默认实现。
装饰器模式的代码结构
我们将上述的内容整理出来一个代码结构,具体如下所示:
1 | // 抽象类也可以替换成接口 |
疑问解答时间
为什么装饰器模式还是用到继承了呢,不是说要利用组合取代继承吗?
在之前的基于继承的设计方案中,我们谈到使用继承的方案会导致类数量爆炸,类的继承结构将变得无比复杂,代码既不好拓展,也不好维护。
在装饰器模式中,使用继承的主要目的是让装饰器和抽象组件是一样的类型,也就是要有共同的超类,也就是使用继承达到「类型匹配」,而不是利用继承获得「行为」。
当我们将装饰器与组件组合时,就是在加入新的行为。这种新的行为并不是继承自超类,而是由组合对象得来的(在代码结构中已给出了明确注释)。
另外,如果是基于继承的设计方案,那么所有的类的行为只能在编译时静态决定,也就是说,行为不是来自于超类,就是子类覆盖后的版本。如果需要新的行为,必须修改现有的代码,这不符合开放关闭原则。
而在装饰器模式中,我们利用组合,可以把装饰器混合使用,而且,可以在任何时候,实现新的装饰器增加新的行为。
为什么 Component 设计成一个抽象类,而不是一个接口呢?
通常装饰器模式是采用抽象类,在 Java 中也可以使用接口。文中给出的代码结构是从源码中提取而来的。
总结一下
装饰器模式主要用于解决继承关系复杂的问题,通过组合和委托来替代继承。
装饰器模式的主要作用就是给组件添加增强功能,可以在组件功能代码的前面、后面添加自己的功能代码,甚至可以将组件的功能代码完全替换掉。
装饰器和具体的组件都继承相同的抽象类或接口(组件),所以可以使用无数个装饰器包装一个具体的组件。
装饰器模式也是有问题的,它会导致设计中出现许多小类,如果过度使用,会让程序变得很复杂。
练习题
现在我们已经知道了装饰器模式,也看过 Java IO 的类图和源码,那么接下来我们来编写一个自己的输入装饰器吧。
需求
编写一个装饰器,把输入流内的所有大写字符转成小写。比如,"HELLO WORLD!",装饰器会把它转换成 "hello world!"
代码实现
首先,我们得扩展 FilterInputStream,这是所有
InputStream 的抽象装饰器。
我们必须实现两个 read()
方法,一个针对字节,一个针对字节数组,把每个大写字符的字节转成小写。
1 | public class LowerCaseInputStream extends FilterInputStream { |
测试一下
1 | public class InputTest { |
test.txt 文件中保存着 "HELLO WORLD!"
运行结果如下:
1 | hello world! |
好啦,以上就是本篇文章的全部内容了。我们讲解了什么是装饰器模式,装饰器模式的标准类图、代码结构,知道了 Java IO 是如何使用装饰器模式的。
希望以上内容对你有帮助,一起加油!
参考资料
- Head First 设计模式
- 设计模式之美
- Patterns in Java APIs